

Monday, April 30, 2018
New Release: Express Dictate Digital Dictation Software for Mac OS X
Friday, April 27, 2018
How to Edit Audio Files with WavePad
How to Edit Audio Files with WavePad

You don’t have to be a professional music producer to record and edit your own music. With easy-to-use music editing software like WavePad, you can take your audio recordings to the next level. Recording and editing your songs yourself is a great way to share and preserve your musical masterpieces and anyone can do it. Whether you are recording your voice for a podcast or you are editing tracks of your band playing live music, it has never been easier to create professional-quality recordings from home.
Record Audio
If you don’t already have an audio recording to work with, don’t worry. WavePad allows you to record audio directly into the program using an accessory microphone or the internal microphone on your computer or device. To begin recording a new track, simply click the red record button, a new blank track will be created and your recording will begin automatically. You can stop your recording by clicking the square stop button, pushing the Esc key, or by clicking anywhere on the track. |
| Recording Audio in WavePad |
Import Audio
If you already have a pre-recorded track you would like to work with, you can easily import the track into WavePad to edit. Simply press Ctrl + O on Windows or Command + O on Mac to open it. You can also go to the main drop-down menu and select File and then Open. Import a file from your computer or external device, or you can choose to open a file directly off of a CD or data disc. You can even import files straight from the Cloud. Make sure to explore the NCH Sound Library for additional audio samples and sounds to add to your music or audio project. |
| Import Audio Files |
Trim Tracks
Trimming down your audio recordings or music tracks is one of the first tasks you will want to complete when you begin editing audio files. WavePad allows you to easily remove the silences from the beginning and end of your recordings. Simply select your entire track, go to the Edit tab, click Trim, and then choose the Auto-trim silence from the Start and End of the File option from the drop-down menu. |
| Trim Out Silences in Your Tracks |
Split Tracks
You can split your recordings and files at any point you would like to in WavePad. Simply place your cursor wherever you would like to split your track, select the Split option from under the Edit tab and then choose "Split at cursor" from the drop-down menu. This will split your audio at the position of the cursor, generating two separate tracks. |
| Split Tracks |
Reduce Noise
Removing background noise from your audio tracks is essential if you want to make your recording sound professional. Background sounds such as chair squeaks, footsteps, and even your own breathing, are all noises that are easily picked up by your microphone. Luckily, they are just as easily removed from your tracks. Choose the track you want to remove noise from and then select the Cleanup option in the Effects menu. From there you can choose from a variety of noise cleanup options, such as auto click/pop removal or noise reduction. |
| Reduce Background Noise |
Mix Audio
The Paste-Mix feature in WavePad allows you to overlay tracks to create mash-ups, voice-overs or layer recorded instruments for that full band sound. To combine the audio from two tracks into one, start by selecting one of the tracks and copying it to the clipboard. Next, select your second track and click on the Paste Mix icon in the menu under the Edit tab. When you play it back you will hear that the two pieces of audio have now been combined. |
| Mixing Audio Tracks |
Volume Control
Now that your song or voice recording is cut down to the good stuff, you can decide what you want to do with your volume levels. Not all microphones are created equally and so your song may end up being a lot louder or a lot quieter than you expected. Select the Levels tab to view some of the different volume control options available in WavePad. Select Normalize Audio from the effects tab to amplify audio gain across the entire track. This is a great last step to finalize your project before exporting. |
| WavePad Volume Control Features |
Save and Export
When you are finished editing your audio project, you will need to save it. WavePad has several easy options for saving and exporting your audio files. Under the Home tab, you can click on the Save icon and choose to burn your song to an audio or data CD, send the file in an email, upload it to the cloud, or save it as a number of audio file formats. If you plan on making additional edits to your project later, you can save all of your work as a WavePad project file to preserve quality. |
| Saving Audio Files |
Thursday, April 26, 2018
Just Released: Copper Point of Sale Software for Windows

Tuesday, April 24, 2018
New Release: Express Animate for Windows

Friday, April 20, 2018
Photo Browser in PhotoPad Photo Editor
PhotoPad Photo Editing Software - Import Photo Browser

NEW - Photo Browser in PhotoPad Photo Editing Software
We are very excited to announce a new Photo Browser option in PhotoPad Photo Editing Software. This highly requested Photo Browser includes larger thumbnail icons which make locating and opening photos a breeze.
How to use PhotoPad Photo Browser
The Photo Browser option in PhotoPad will allow you to browse the images on your computer in a gallery view. This can be very useful when locating a particular photo among a batch of photos on your computer, or when importing multiple photos at one time. To open a photo using the thumbnail gallery view, click on the "Photo Browser" button in the Home tab.

Navigate and Select Photos Easily
On the left-hand side of the Photo Browser, you can select a folder from your computer to view. The Photo Browser allows you to open photos from multiple folders. The images from the selected folder will appear as thumbnails on the right-hand side of the Photo Browser window.
Drag and Drop to Select Photos to Edit
To select a photo to open, drag and drop the photo from the gallery to where it says "Drag photos here to edit with PhotoPad".
Confirm Selected Photos
Photos that have been selected will have a checkmark overlay visible in the photo browser. The checkmark icon appears in the upper right-hand corner of photos which will be opened to edit in PhotoPad. This can be useful when opening many photos at once.
You can click on the checkbox in the upper right-hand corner of a photo in the Photo Browser to select or deselect the photo to be opened. If the checkbox has a checkmark, the image has been selected to be opened. To remove a photo from the bottom row of selected photos which will be opened, deselect this checkbox.

Photos can also be removed from the row of selected photos at the bottom of the Photo Browser by clicking on the "X" in the upper right-hand corner of the photo.

Open Selected Photos to Edit
To open the selected photos from the photo browser, click on the "Open" button at the bottom of the screen. All of your selected photos will be opened in PhotoPad where they can be edited and adjusted as needed.
After opening your photos, you can use PhotoPad to apply filters, adjust lighting, crop, retouch, and resize photos. We have a series of PhotoPad Photo Editing Tutorial Videos to help you get started editing.
After you have mastered the basics of photo editing with PhotoPad, you may enjoy:
- 5 Easy Tips for Editing Travel Photos
- Add Color to Black and White Photos
- Create a DIY Embroidery Pattern from a Photo
- Combine Black and White with Color in Photographs
New Release: MixPad Multitrack Recording Software for Windows

Wednesday, April 18, 2018
New Release: Zulu DJ Software for Windows

Friday, April 13, 2018
Just Released: VideoPad Video Editor for Mac OS X

Thursday, April 12, 2018
New Release: VideoPad Video Editor for iOS

New Release: Prism Video File Converter for Windows

Wednesday, April 11, 2018
How to Edit Travel Videos with VideoPad
How to Edit Travel Videos with VideoPad

You have just returned home from one of the greatest adventures of your life. Your bags are unpacked, your passport is put away and your head is filled with unforgettable vacation memories. You are probably starting to think about all of those videos you took and are now wondering what you are going to do with them all. Making travel videos is a great way to preserve and share your travel memories. With an easy-to-use video editor like VideoPad you can create stunning travel video content that you will want to watch over and over again.
Trim Your Clips Down to the Good Stuff
The cold hard truth is that nobody is going to want to watch an hour-long clip of your boat ride or surf lesson, and once you get home neither will you. One of the first things you should do with your travel footage goes to and trim your clips down to the good stuff. If you are combining clips to make a travel video, 2-3 minutes is best for Facebook and YouTube. Anything longer and you will lose people's attention. Individual clips can usually be cut down to 5-15 seconds of action. A video with many different clips is always more engaging to watch than a video with a few extremely long clips. |
| Trim Down Your Clips and Video |
Crop Out Unwanted Objects
So there you were, filming the perfect shot of that vacant beach when a loan swimmer pops up out of nowhere and ruins it! Well, don't sweat it! VideoPad allows you to crop your videos so that you can keep what you want in the frame and cut out all of the distractions. |
| Crop Out Unwanted Objects |
Add Titles and Captions
Adding titles and captions to your travel videos is a great way to make sure that you and your viewers get the extra info that may not be obvious just by looking at the scenery. It's a good idea to start a travel video with a title of the location and perhaps the date. Captions can also be used for displaying translations when someone is speaking a different language or when someone is speaking too quietly for your camera's microphone. |
| Add Titles and Captions to Your Travel Videos |
Add Some Music
Music is an essential component of any travel video or travel movie. Music tells your viewers how to feel when they are watching your video. Nothing sets the mood for a travel video quite like a song that reminds you of your trip. Try to find a song that is actually from the place you visited or perhaps one that is sung in the language of that country. VideoPad allows you to import music from many different sources and then adjust and edit the track as you please. |
| Add Music to Your Travel Video |
Use Transitions
Transitions are a great way to make your travel video feel more fluid and natural. Without transitions, the quick changes between clips will feel abrupt and jarring. VideoPad has many great transitions so that your clips flow together smoothly. Using transitions will help make your travel video look more professional and be overall more pleasant to watch.| Apply Transitions |
Share Your Videos
Now that you are finished editing your travel video, it's time to share it with the world. One of the best features of VideoPad for a vacation movie editor is that you can upload videos directly from the software to YouTube. This means you can skip filling out descriptions on YouTube and instead quickly fill them out in VidePad and post! Share your memories with the world and inspire others with your stunning world travel videos. Start a travel blog and post more travel videos as you create them and find others who share your passion. |
| Share Your Travel Video |
Monday, April 9, 2018
Just Released: PhotoPad Image Editor for Windows

Friday, April 6, 2018
Create a Video from Photos with Slideshow Software
Create a Video from Photos with PhotoStage Slideshow Maker

Create a Video from Photos
From baby's first steps to graduation tears of joy, family vacations, weddings, and honeymoons, we take and save photos of our memories every day. At times it may seem impossible to organize and share such a wealth of memories with your friends and family. Social media is a great way to share everyday photos, however, you may want to create a more polished production for your most cherished memories. To easily organize and share your photos, you can create a video slideshow from photos.How to Make a Video from Photos
Creating videos from your photos of specific events can be a beautiful and meaningful way to organize your photos. Create annual DVDs to chronicle family ski trips, reunions, and summer beach getaways. Make a slideshow to organize all of the fabulous photos from your European vacation in one place. Create the perfect gift to send to grandma and grandpa, or a cherished memento DVD for your children to look back on as they grow up. For newlyweds, a wedding slideshow is a popular way to showcase your favorite photos from your big day. Creating a video from photos is a quick and easy process when using slideshow software, such as PhotoStage SlideShow Maker.You can create a slideshow video from photos in three easy steps:
- Select your favorite photos
- Arrange photos in the slideshow
- Add Music, Effects, Animations, or Text
Step 1: Select your Favorite Photos
To select the photos that you would like to add to your slideshow, begin by importing the media that you would like to use in PhotoStage. To do this, click on the "Add Media" button in the top menu bar and select the photos that you would like to use from your computer. Alternatively, you can use the "Add Photos", "Add Video" and "Add Audio" buttons to upload media to your slideshow. Photos, videos, and music will be added to the "Media" tab.
If you are using lots of photos in your video, you may want to check to make sure that all of the images which were imported into the Media tab have been included in your video. When a photo has been added to the slideshow, a green checkmark will appear over the photo in the Media tab.

Step 2: Arrange Photos in Video
To add photos to your slideshow, drag and drop photos from the Media bin onto the Slideshow at the bottom of the program window where it says "Drag your image and video clips here". You can also drag and drop photos to re-arrange them in your slideshow video.
Adjust Photo Duration
To adjust the duration of a photo in the slideshow, click on the time icon at the bottom of a slide, or double click on the slide. In the slide adjustment window, you can set the photo duration in seconds. You can also change the duration of all of the slides in your slideshow by checking the box to "Apply to all".
Select a Photo Transition
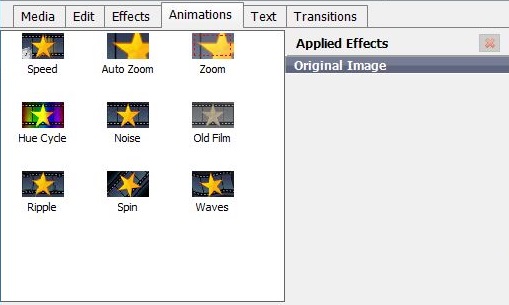
You can easily change the transition animations that appear between the photos in your video slideshow. Transitions can fade from one photo to the next in a variety of exciting ways.Step 3: Add Music, Effects, Animation, or Text to Perfect Your Video
Edit Your Photos
PhotoStage slideshow software includes a number of photo editing effects that can quickly crop, adjust, brighten, and rotate the photos that you add to your video slideshow. To edit a photo, click to select the photo in the slideshow, and then click on the "Edit" tab.


Bring your Photos to Life with Effects and Animations
PhotoStage slideshow creator also includes a variety of effects that can be applied to photos.

Add a touch of nostalgia with a sepia filter, add a border, or transform your photos into oil paintings with these easy-to-apply effects.

For more advanced effects, you can add animations to your photos. Animations can be added to photos in your slideshow to create movement, such as a zoom effect. Animations can be applied to photos individually, or you can add multiple animations to a single photo to combine effects.
Add a Title Slide
You can also add a blank slide to your video slideshow in order to create a title slide. To add a blank slide, click on the "Add Blank" button in the top menu bar.
Select the color slide that you would like to add, and then drag and drop the blank slide to your desired location in the slideshow.
Add Text to Photos
To add text to a photo in your slideshow video, select the photo that you would like to edit and click on the "Text" tab. There are several text options to choose from.

Click to select the text option that you would like to add to your photo, and then adjust the font, alignment, size, and text color in the Applied Effects area of the Text tab.

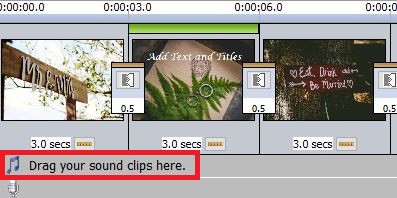
Add Music to Your Slideshow
Music is a quick and easy way to add emotion and ambiance to any video. To create a slideshow with music, you can upload music from your computer, or you can use the music in the NCH Audio Library. To add your own music, click on the "Add Music" button in the Media tab, or click on the "Add Media" button in the top menu bar.

Audio tracks will be added to the Media tab. To add music to your slideshow, drag and drop the audio file that you would like to use from the Media tab to the slideshow where it says "Drag your sound clips here"
To add music from the NCH Sound Library, open the "Slideshow" menu, and open the NCH Sound Effect Library.

The sound effect library includes many sound effects and music tracks that you can use in your slideshow.

Add a Narration
To personalize your slideshow video, you may wish to add a voice-over narration. To record a narration for your slideshow, click on the "Narration" button in the top menu bar.


